Post Name

Locked Out? Here’s What to Do Next

Imagine this: you’re rushing to an important meeting or trying to get your kids to school, only to discover you’ve lost your car keys or locked them inside your vehicle. Panic sets in, and the inconvenience seems insurmountable. Losing or damaging your car keys is a frustrating, but surprisingly common problem. Luckily, car key replacement services are more advanced and accessible than ever. But where do you start? From understanding key types to navigating costs and services, this guide breaks down everything you need to know about car key replacement.

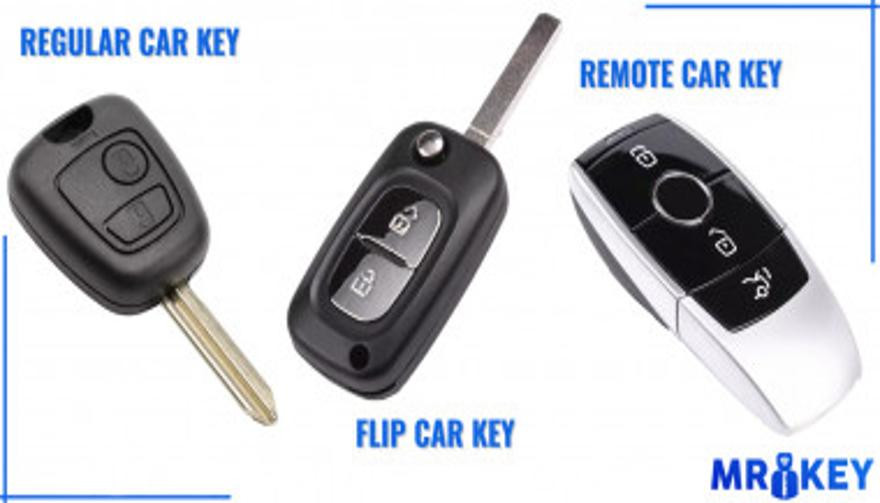
Understanding Car Key Types: The First Step to Replacement

Before diving into the replacement process, it’s essential to identify the type of car key you have. The complexity of your key determines the cost and the effort required for replacement.

Traditional Mechanical Keys

  • The simplest and most common in older vehicles.
  • Easily duplicated at hardware stores or locksmiths.

Transponder Keys

  • Equipped with a microchip that communicates with the car’s ignition system.
  • Offers enhanced security, as the car won’t start without the correct chip signal.

Remote Key Fobs

  • Allows remote locking, unlocking, and other functions like opening the trunk.
  • Replacing a lost or damaged fob can be more expensive due to programming needs.

Smart Keys

  • Found in modern luxury cars, these keys provide keyless entry and start.
  • Operate via proximity sensors, making them highly convenient but costly to replace.

Each key type requires a different replacement approach, so understanding your key’s functionality is crucial.

The Replacement Process: What to Expect

Replacing a car key can range from a quick, inexpensive fix to a more involved process requiring specialized tools and expertise. Here's a step-by-step overview of what to expect:

Determine Your Replacement Options

  • Authorized Dealership: Best for complex keys, but often the most expensive option.
  • Local Locksmith: Typically faster and more affordable for mechanical keys and some transponders.
  • Online Services: Websites offering key duplication or fob replacements can be convenient, though programming may still require a locksmith.

Gather Essential Information

  • Vehicle identification number (VIN) and proof of ownership.
  • Details about the key type and car make and model.

Programming and Testing

  • Keys with transponders or fobs often require programming to match your car’s system.
  • A professional locksmith or dealership will ensure the new key functions seamlessly.

Costs: How Much Should You Expect to Pay?

The cost of car key replacement varies significantly based on the key type, service provider, and your location. Here’s a general breakdown:

  • Mechanical Keys: $10–$50 for duplication.
  • Transponder Keys: $75–$200, including programming.
  • Remote Key Fobs: $150–$400, depending on the car make and model.
  • Smart Keys: $250–$600, with luxury models at the higher end.

Factors affecting cost include the car's age, whether you need key programming, and the urgency of the service. Always compare prices across locksmiths, dealerships, and online providers for the best deal.

A Global Perspective: Trends and Innovations in Car Key Replacement

Car key replacement practices vary worldwide, influenced by technology, availability of services, and local regulations.

  • United States and Europe: Locksmiths and dealerships dominate the market, with online platforms gaining traction for basic duplications.
  • Asia: With the rise of smart keys in markets like Japan and South Korea, dealerships often handle replacements due to proprietary technology.
  • Emerging Markets: Mechanical keys are still prevalent, and costs are generally lower, though advanced key systems are increasingly common.

Global trends indicate a shift toward digital and biometric key systems, with smartphone-based replacements and app-controlled access gaining popularity. However, these advancements also raise concerns about cybersecurity and hacking.

Tips to Avoid Future Key Emergencies

While no one can predict when a key might be lost or damaged, a few preventative measures can save you from headaches down the road:

  • Invest in a Spare Key: Having a duplicate ready can save time and money.
  • Use a Key Finder Device: Attach a Bluetooth tracker to your keyring to locate lost keys easily.
  • Protect Smart Keys: Store them in a signal-blocking pouch to prevent relay attacks.

Plan Ahead and Stay Prepared

Car key replacement might seem daunting, but with the right knowledge and preparation, it’s a manageable process. Understanding your key type, exploring your replacement options, and taking preventative steps can save you time and money.

If you’re facing a key emergency, start by identifying your options and gathering the necessary information. And for the future, consider investing in a spare or upgrading to a more secure system.

Losing your car keys may be inconvenient, but it doesn’t have to derail your plans. With modern solutions and a little foresight, you’ll be back on the road in no time.

Related Posts

The Essential Car Parts Guide: Understanding Your Vehicle's Core Components

The Essential Car Parts Guide: Understanding Your Vehicle's Core Components

Unveiling the Anatomy of Your Car Your car is more than just a mode of transportation—it's a complex machine composed of various parts working in harmony to ensure smooth and safe driving. Understanding these essential car parts not only helps you appreciate your vehicle better but also empowers you to identify issues, perform basic maintenance, and communicate effectively with mechanics. In this guide, we’ll explore the key components that keep your car running and why they’re vital for optimal performance. 1. Engine: The Heart of Your Vehicle The engine is the powerhouse of your car, converting fuel into energy to propel the vehicle forward. There are various types of engines, including: Internal Combustion Engines (ICE): Common in most vehicles, using gasoline or diesel. Hybrid Engines: Combining a traditional engine with an electric motor for better efficiency. Electric Motors: Found in EVs, powered by rechargeable batteries. Key components within the engine include pistons, the crankshaft, and the timing belt. Regular maintenance like oil changes and timely inspections are crucial for keeping the engine in good condition. 2. Transmission: Changing Gears Made Easy The transmission system ensures that power from the engine is transferred to the wheels at the correct speed and torque. There are two main types of transmissions: Manual Transmission: Requires the driver to shift gears manually. Automatic Transmission: Shifts gears automatically, providing greater convenience. Proper transmission fluid levels are essential for smooth gear transitions and the longevity of the system. 3. Battery: Your Vehicle's Power Source The car battery supplies the electrical power needed to start the engine and operate various electrical systems, such as lights, wipers, and infotainment. Modern vehicles may also include auxiliary batteries for additional power needs. Maintenance Tip: Regularly check battery terminals for corrosion and ensure proper voltage levels, especially in extreme weather conditions. 4. Braking System: Your Lifeline on the Road The braking system ensures the vehicle slows down or stops when needed, making it a critical safety component. Key parts include: Brake Pads and Rotors: Convert kinetic energy into heat, slowing the car down. Brake Fluid: Transfers force from the brake pedal to the braking mechanism. Regular inspection of the braking system can prevent wear and ensure reliability. 5. Tires and Wheels: Where the Rubber Meets the Road Tires and wheels are vital for traction, handling, and overall vehicle stability. There are various types of tires designed for specific conditions, such as all-season, winter, and performance tires. Maintenance Tip: Regularly check tire pressure, alignment, and tread depth to ensure safe driving and optimal fuel efficiency. 6. Suspension System: Smoothing Out the Ride The suspension system absorbs shocks from uneven road surfaces, ensuring a smooth and stable ride. Key components include: Shock Absorbers: Reduce impact from road irregularities. Struts and Springs: Provide structural support and maintain balance. A well-maintained suspension system enhances comfort and handling. 7. Exhaust System: Keeping Emissions in Check The exhaust system directs harmful gases away from the engine and reduces emissions. Key components include the muffler, catalytic converter, and exhaust pipes. Environmental Note: A faulty exhaust system can increase emissions and negatively impact air quality. Regular checks are essential for compliance with emission standards. 8. Cooling System: Preventing Overheating The cooling system regulates the engine's temperature to prevent overheating. It includes components like the radiator, coolant, and thermostat. Maintenance Tip: Regularly check coolant levels and inspect hoses for leaks to ensure efficient cooling. 9. Fuel System: Delivering Energy to the Engine The fuel system stores and supplies fuel to the engine for combustion. Key parts include the fuel pump, injectors, and fuel tank. Efficiency Tip: Clean fuel injectors and replace the fuel filter as needed to maintain optimal fuel efficiency. 10. Electrical System: Powering Your Vehicle's Features From the headlights to the infotainment system, the electrical system powers numerous features in your car. It includes wiring, alternators, and fuses. Maintenance Tip: Inspect fuses and ensure the alternator is functioning properly to avoid electrical issues. Empowering Yourself Through Knowledge Understanding the essential parts of your car equips you with the knowledge to maintain your vehicle effectively and address issues proactively. By staying informed, you can extend the life of your car, save on repair costs, and ensure a safer driving experience. Whether you’re a car enthusiast or a regular driver, knowing your vehicle’s anatomy is the first step toward smarter car ownership.

Programming Your Car’s Keyless Remote: A Simple Guide for Every Car Owner

Programming Your Car’s Keyless Remote: A Simple Guide for Every Car Owner

When it comes to convenience, car keyless remotes have revolutionized the way we interact with our vehicles. No more fumbling with traditional keys or worrying about locking yourself out. With just a push of a button, you can lock, unlock, and even start your vehicle. But what happens when your keyless remote stops working, or when you need to program a new one? Here’s a simple guide to help you program your car's keyless remote, regardless of your vehicle's make or model. Understanding Keyless Remotes Before jumping into the programming process, it’s important to understand what a keyless remote is and how it works. Essentially, a keyless remote allows you to interact with your vehicle without needing to physically insert a key. Instead of using a traditional metal key, your car’s electronic system communicates wirelessly with the remote, allowing you to lock, unlock, and sometimes even start your vehicle, all with the push of a button. These remotes typically use a radio frequency to communicate with your car, sending a signal that’s encrypted for security. Most modern cars use transponder technology, which makes the system more secure and resistant to hacking or copying. This means that the remote must be properly programmed to your vehicle’s system to function correctly. When Do You Need to Program a Keyless Remote? There are several situations in which you might need to program your keyless remote: Replacing a Lost or Damaged Remote : If you’ve lost your keyless remote or it’s no longer functioning properly, you’ll need to get a replacement. This may require programming the new remote to sync with your vehicle. Adding a New Remote : If you’ve bought an additional keyless remote for your car (for a spouse, child, or other family member), you’ll need to program it so that it works with your vehicle. Battery Replacement : Sometimes, replacing the battery in your remote can cause the programming to reset, meaning you’ll need to reprogram the remote for it to work again. Changing or Resetting Vehicle Settings : Occasionally, vehicle settings or remotes can be reset or reprogrammed as part of regular maintenance, requiring you to program new or additional remotes. How to Program Your Car’s Keyless Remote Programming a keyless remote is easier than you might think, and in most cases, it can be done by following a few simple steps. The process varies slightly depending on the make and model of your car, but here’s a general overview of the steps involved: Get Your New or Replacement Remote : Ensure that your remote is compatible with your car’s system. If you're not sure, you can check with your car's manufacturer or an authorized dealership. Some remotes require specific codes to be programmed. Sit Inside Your Vehicle : For safety and security reasons, most cars require you to be inside the vehicle while programming the remote. Insert the Key in the Ignition : Insert the key into the ignition and turn it to the "ON" position without starting the engine. For cars with push-to-start systems, you may need to press the start button without pressing the brake pedal. Activate the Programming Mode : Depending on your car’s system, you’ll need to follow a sequence of steps to enter programming mode. This could involve turning the key on and off several times, or pressing certain buttons in a specific order. Refer to your vehicle’s manual for the exact steps, as the process can differ from one model to another. Program the Remote : Once your car is in programming mode, you’ll need to press the button on your keyless remote that you want to program. Usually, you’ll hear a chime or see the lights flash, indicating that the remote has been successfully programmed. Some cars may require you to press the button several times to ensure proper synchronization. Test the Remote : After programming, test the remote to make sure it works properly. Try locking and unlocking the doors or starting the engine. If everything works as expected, you’re done! Exit Programming Mode : To finish the process, simply turn off the ignition and remove the key. This should exit programming mode. If you have additional remotes to program, repeat the steps above for each one. What to Do if Programming Doesn’t Work While programming a keyless remote is usually a straightforward process, there are instances where things don’t go as planned. If your remote isn’t syncing with your car after following the steps, here are a few troubleshooting tips: Check the Battery : If the remote’s battery is dead or weak, it won’t transmit the signal to your car. Replace the battery and try programming again. Verify the Compatibility : Make sure that the remote is compatible with your vehicle’s make, model, and year. Some vehicles require special remotes that can only be programmed by the manufacturer or an authorized locksmith. Reset Your Vehicle’s System : In some cases, you might need to reset the car’s system to clear previous programming attempts. Check your owner’s manual or consult a professional for assistance. Consult a Professional : If you continue to have issues, it might be time to visit a dealership or a certified locksmith. These professionals have the tools and experience to program the remote correctly and ensure everything works seamlessly. Why Programming Your Keyless Remote Is Important Programming your keyless remote is a simple but important task that helps ensure your car’s security and convenience. By understanding how the process works and what to do if things go wrong, you’ll be able to troubleshoot and solve any issues quickly. Whether you’re replacing a lost remote or adding a new one to your collection, knowing how to program your remote saves time and money compared to visiting a dealership or locksmith. With the increased reliance on keyless remotes for unlocking and starting vehicles, it’s essential for every car owner to be familiar with this process. By keeping your remote in good working condition and knowing how to program it when necessary, you’ll enjoy a smoother, more efficient experience with your vehicle.

The Secret to Smooth Locks: How (and Why) to Lubricate Your Locks Like a Pro

The Secret to Smooth Locks: How (and Why) to Lubricate Your Locks Like a Pro

Regular lock maintenance is essential to prevent key jamming or lock failure. Proper lubrication reduces wear and tear, ensures smooth operation, and extends the lifespan of your locks. A well-lubricated lock decreases the risk of your key getting stuck or breaking inside the lock—an inconvenient and costly problem. At MR-KEY , we understand the importance of well-maintained locks and want to help you keep yours in top condition. How Often Should You Lubricate Your Locks? For most locks, lubricating them every three to six months is sufficient. However, locks exposed to extreme weather conditions—such as those on towbars, roof racks, or outdoor gates—require more frequent maintenance. Rain, dust, and freezing temperatures can cause internal components to stick, making it difficult to insert or turn the key. If you notice resistance when using a lock, it’s time for lubrication. What Lubricant Should You Use for Locks? Choosing the right lubricant is crucial for long-term lock performance. Here are the best options: • Teflon-based (PTFE) spray – Forms a protective film inside the lock, reducing friction and repelling dust buildup. • Dry silicone spray – Excellent for outdoor locks as it resists moisture without attracting dirt. • WD-40 Specialist Dry PTFE or White Lithium Grease – Unlike regular WD-40, these provide long-lasting lubrication and protection against corrosion. • Graphite powder – A great choice for older locks but should not be used if there’s oil residue inside the lock. While WD-40 Multi-Use is a quick fix for stuck locks, it is primarily a cleaner rather than a long-term lubricant. If used, follow up with a dry lubricant to prevent dirt accumulation inside the lock. How to Lubricate a Lock If your lock is functioning properly but feels slightly stiff, follow these steps: 1. Clean the Lock – Insert and remove the key a few times to dislodge debris, wiping it clean each time. 2. Apply the Lubricant – Insert the spray straw into the keyhole and apply two short bursts of lubricant. 3. Work the Lock – Insert and turn the key multiple times to distribute the lubricant inside. 4. Wipe Excess Lubricant – Remove any residue from the key and lock exterior to prevent dirt buildup. For graphite powder , follow the manufacturer’s specific instructions, as overapplication can lead to clumping inside the lock. Special Care for Towbar and Roof Rack Locks Locks on towbars and roof racks are exposed to harsher conditions than typical door locks. To keep them in good shape: • Regularly inspect them for stiffness or corrosion. • Apply dry silicone spray or PTFE lubricant for lasting protection. • If the lock is exposed to frequent moisture, white lithium grease offers superior water resistance. Lock It in: The Key to Long-Lasting Security Regular lock maintenance is a small effort that prevents big problems. By keeping your locks clean and properly lubricated—especially those exposed to the elements—you can avoid costly repairs and ensure they function smoothly for years. For high-quality lock maintenance products, visit MR-KEY and keep your locks in perfect working condition. A little maintenance goes a long way in ensuring security and peace of mind!

What You Need To Know About BMW  Swirl Flaps and How To Solve The Problem With Them

What You Need To Know About BMW  Swirl Flaps and How To Solve The Problem With Them

Swirl flaps are a BMW system that has been introduced to help burn the fuel mixture in the cylinder better due to the fact that diesel engines do not have throttle valves and it is not possible to adjust the air-fuel ratio. A diesel engine without vortex valves operates between a poor and a rich fuel mixture, because the only way to regulate it is through fuel injection. Design of the first generation swirl flaps that are made of made of metal. Unfortunately, swirl flaps are responsible for countless damaged engines and costly repairs due to design errors or metal fatigue. Once damaged, the cylinder sucks them in and causes great damage. This is how damaged valves damage the cylinder. Typical swirl flaps suction damage. The vortex valves are positioned in the inlet and are controlled by vacuum (DDE 4.0) or electrically (DDE5.0 / DDE6.4) by the engine ECU. Effects of malfunctioning valves: Swirl valves are stuck in open position: Deterioration of exhaust gas performance at lower speeds. Swirl valves are stuck in closed position: Approximate power loss of 10% at high engine speeds. How swirl flaps work: Performance characteristics: The vortex valves are in the closed position, at low engine speeds and small amounts of fuel injected (controlled by the ECU card). They open under the following conditions: coolant temperature <14 ° C OR * fuel quantity> 24 mg OR 2. engine speed 2250 rpm OR 3. inlet air temperature <-5 ° C. BMW and Pierburg have decided to produce diesel engines with metal vortex valves. The speed at which the pistons in the diesel engine operate is at least 60 rpm, so a sucked vortex valve will break and cause a number of damages inside the engine. In most cases, one or more pistons are severely damaged, as a bonus you get valves, in some cases a head or turbocharger. And this combination with a BMW engine is like a cumulative jackpot 🙂 In 2004, BMW began work on the problem and improved the design, however, a number of owners reported ongoing problems in this area. The solution to this problem is by removing the vortex valves and plugging, which does not affect the performance of the engine and at the same time, you can safely pass the exhaust test. Engines: M47 (136hp VP44 fuel pump) has no valves. M47N common rail engine (including M47N / M47TU / M47TUD20) (150hp. Face lift model from 2001 -) has valves. M57 engines (M57D) (525d & 187hp. 330d) cars with manual transmission do not have valves, but those with automatic have. M57N engines (M57TUD) (525d & 330d 204hp) have vortex valves. Ruined swirl flapss: The plugs that replace the vortex valves are easy to find on the internet, but you can also find them here on our website. Typical plugs: Disassembly of vortex valves: The vortex valves can be safely dismantled and in most cases if they are removed properly no loss of power is felt. Final list of models for which vortex valves are installed: Engine: M47N/M47TU/M47TUD20 Applications: * 110 kW (148 hp) and 330 N·m (243 lb·ft) o E46 320d 2001-2005 o E83 X3 2.0d (up to end of 2006) Engine: M47TU2D20 The engine was updated again in 2004 as the M47TU2D20. Still at 1995 cc, it produced more power across the range. Applications: * 120 kW (161 hp) and 340 N·m (251 lb·ft) E60/E61 520d E87 120d E90/E91 320d E83 X3 2.0d (end of 2006 onwards) Engine: M57/M57D25 M57D25 was introduced in 2000. Applications: * 166 PS (122 kW; 164 hp) at 4000 rpm, 350 N·m (260 lb·ft) at 2000-2500 rpm with a 4750 rpm redline, models: 2000-2003 E39 525d *Vehicles With Automatic Transmission ONLY* Engine: M57N/M57TU/M57TUD25 M57TUD25 was introduced in 2004. Applications: * 177 PS (130 kW; 175 hp) at 4000 rpm, 400 N·m (300 lb·ft) at 2000-2750 rpm models: E60/E61 525d Engine: M57/M57D30 M57D30, also called M57D29, was introduced in 1998. Applications: * 184 PS (135 kW; 181 hp)@4000, 390 N·m (290 lb·ft)@1750-3200 models: E39 530d *Vehicles With Automatic Transmission ONLY* E46 330d/330xd *Vehicles With Automatic Transmission ONLY* * 184 PS (135 kW; 181 hp)@4000, 410 N·m (300 lb·ft)@2000-3000 models: E38 730d *Vehicles With Automatic Transmission ONLY* E53 X5 3.0d * 193 PS (142 kW; 190 hp)@4000, 410 N·m (300 lb·ft)@1750-3000 models: E38 730d E39 530d Engine: M57N/M57TU/M57TUD30 M57TUD30 was introduced in 2002. It originally produced 160 kW (215 hp) at 4000 rpm and 500 N·m (370 lb·ft) at 2000-2750 rpm, but was tweaked for 150 kW (201 hp) at 4000 rpm and 410 N·m (300 lb·ft) at 1500-3250 rpm for 2003 and again for 200 kW (268 hp) at 4000 rpm and 560 N·m (410 lb·ft) at 2000-2250 rpm in 2004. Applications: * 204 PS (150 kW; 201 hp)@4000, 410 N·m (300 lb·ft)@1500-3250 models: E46 330d/330Cd/330xd E83 X3 3.0d * 218 PS (160 kW; 215 hp)@4000, 500 N·m (370 lb·ft)@2000-2750 models: E53 X5 3.0d E60/E61 530d/530xd E65 730d * 272 PS (200 kW; 268 hp)@4000, 560 N·m (410 lb·ft)@2000-2250 E60/E61 535d * 245 PS (180 kW; 242 hp)@4000, 500 N·m (370 lb·ft)@2000-2250 * 286 PS (210 kW; 282 hp)@4000, 580 N·m (430 lb·ft)@2000-2250 Engine: M57TU2D30 M57TU2D30 was introduced in 2007, making its debut in the facelifted E60 and E61. * M57TU2D30-UL: 197 PS (145 kW; 194 hp) * M57TU2D30-OL: 235 PS (173 kW; 232 hp)@4000, 500 N·m (370 lb·ft)@2000-2750 * M57TU2D30-TOP: 286 PS (210 kW; 282 hp), 580 N·m (430 lb·ft) Applications: * 197 PS (145 kW; 194 hp), 400 N·m (300 lb·ft) models: E90/E91/E92 325d E60/E61 525d/525xd * 231 PS (170 kW; 228 hp)@4000, 500 N·m (370 lb·ft)@2000-2750 models: E65 730d E90/E91 325d E90/E91 330d/330xd * 235 PS (173 kW; 232 hp) models: E60/E61, BMW E70, BMW E71 * 286 PS (210 kW; 282 hp), 580 N·m (430 lb·ft) models: E60/E61 535d E70 X5 3.0sd E71 X6 xDrive35d E83 X3 3.0sd E90/E91 335d The above models are listed for information only if you want to to make sure your engine has valves installed, please contact a competent person. Please note that the information described above is for informational purposes only and does not claim to be reliable. Mr-key.com is not responsible for any repair work you undertake that is related to the topic described in this article.

Chat with us