Post Name


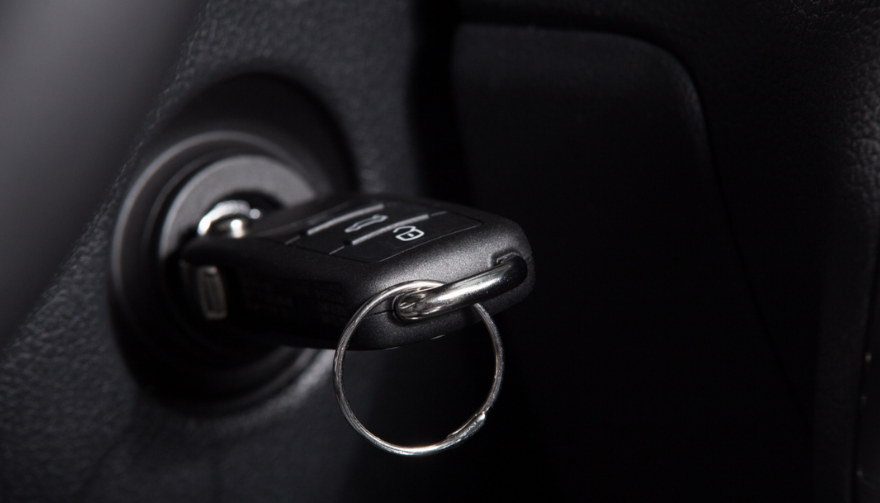
1. Why this happens and why you must act fast


Losing car keys while travelling is more common than you might assume. Whether it’s slipping out of a beach bag, leaving them at a café or dropping in transit, your vehicle becomes vulnerable. In addition, modern keys increasingly contain electronic transponders, chips or fobs—meaning replacement cost and complexity shoot up.

When you’re away from home, both the stress and the stakes increase: you may face towing, expensive replacements or worse — being stranded.

The sooner you act the less time you give for theft, theft-of-opportunity or further cost escalation.


2. Immediate steps when you realise your keys are missing


a) Stay calm and retrace your steps

Start by pausing. Panic hampers clear thinking. Consider the last time you remember using your keys: in the car, on unloading luggage, at hotel reception. Retrace your route slowly. As RAC advise, this step often resolves the problem without cost. 

b) Search systematically

Check all pockets, bags, seats, coat hangers, beach bags, under cushions, in and around your car. If you’re staying somewhere temporarily, check hotel rooms, fuelling stations, parking lots. As one travel-site suggests: “Go through all your pockets… look around all surfaces in your hotel room”. 

c) Contact places you visited

Call restaurants, cafés, shops, airport parking or hotels where you parked the vehicle. Key finders are often handed in.

d) Assess risk of theft

If you suspect the keys were stolen (pick-pocket, hotel burglary or unattended vehicle) you should alert local police and your insurance provider—once a key is missing, your vehicle security is compromised.

e) Secure the vehicle

If the vehicle is parked in an insecure location, consider moving it (if possible) or arranging towing. Leaving it locked but unattended increases theft risk.


3. How to use replacement key delivery services


Replacement key delivery refers to services that cut and program a new car key and deliver it (or have it fitted) to your location—whether your holiday base, airport car park or home driveway.


Steps to follow:


Have vehicle details ready: make, model, year, registration number, VIN if available. 

Choose service: For UK and travel users, many auto-locksmiths offer mobile services that come to you. 

Confirm delivery logistics: Where is the vehicle parked? Will you be present when the key is delivered or fitted? If abroad, is the company able to support your location? 

Understand key type: Basic mechanical, transponder chip key, keyless fob—all vary in price and logistics. 

Check old key de-activation: A top provider will delete the lost key’s code so it cannot be used in future—critical for security. 


Why this is often your best path while travelling


Going via your vehicle manufacturer dealer is often slower and pricier — as UK guide notes: “The quickest and least expensive way … is via an auto locksmith.” 

In a foreign locale, a mobile specialist or key-delivery service saves towing the vehicle and waiting for factory part shipment.


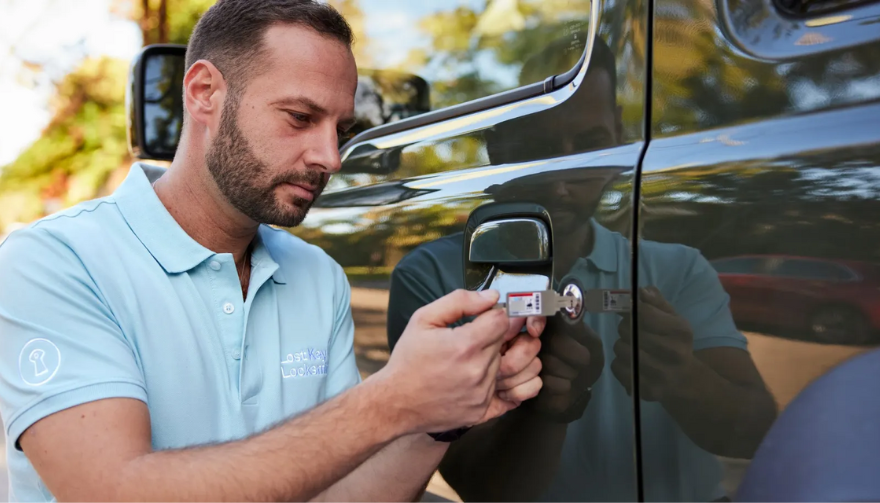
4. Hiring an emergency locksmith: what to look for


When you’re locked out or stranded, an emergency locksmith (24-hour) can be your lifeline. But not all are equal.


Checklist:

Confirm they specialise in auto locksmith / car key replacement, not just domestic locks. 

Ask for credentials (affiliation with industry body).

Insist on proof they will delete/pair the key to your vehicle (so lost key becomes useless). 

Understand travel/overseas call-out charges.

Before arrival, ask for an estimate and payment process (card, cash etc.). Some holiday locales only accept cash. 

Stay with your vehicle in a safe public place. If you are on a remote vacation site, move to well-lit area before the locksmith arrives.


Typical process:


The locksmith arrives, verifies ownership (ID + logbook/V5C). 

They cut and/or program a key, or fix the lock/immobiliser if required.

You pay for service and receive the new key — vehicle is back on the road.


5. Insurance, roadside cover and overseas travel issues


Insurance/key cover

Do you have lost key cover? Most UK car insurance policies don’t include lost keys as standard. You might need a premium add-on. 

If you claim, your no-claims bonus may be affected. 

Breakdown/roadside assistance

Your breakdown provider (e.g., Motorway or RAC) may offer key services, but often their vans don’t carry full key-programming equipment. So an auto locksmith still may be needed. 

Travelling abroad

Check if your insurance/cover extends to the country you’re in.

Confirm language support and local currency charges with any service you call.

If you rented the car: contact the rental company immediately — they may have specific protocols for lost keys (often expensive). 


6. Special cases: rental vehicles, keyless entry & fobs


Rental vehicles


When you lose the keys to a hire car abroad, you are likely to be liable for high fees. Rental companies will likely charge for towing and replacement, not just the locksmith. According to travel forums:


“We do not offer coverage for lost keys… The replacement fee of $125 for lost key.”  

Call the rental agency, follow their instructions, and keep all receipts.


Keyless / smart keys & modern cars


Most vehicles since 2000 use transponder chips or keyless systems. Replacement these can cost several hundred pounds—UK guides show typical range from £100–£300 or more depending on brand. 

When you lose a keyless fob, you may need the original still in possession or need the vehicle brought to the dealer. Factor this potential delay into your travel plans.


Single key left


If you only have one remaining key, treat it as your last key. Get a spare made ASAP once you’re home so you’re not in the same situation again.


7. Preventative measures for your next trip


Always carry a spare key at home or with a trusted person.

Use a tracker (such as an AirTag or Bluetooth key-tracker) on your keyring. UK blogs suggest this simple tech helps locate lost keys. 

Establish a routine spot where you place your keys at the start of every journey.

If you have old keys (house + car), don’t mix them during travel.

Note down your vehicle details (make, model, registration, VIN) in your phone before travelling—so you’re ready if you need a replacement.

For holiday car hire, take a photo of the key and keep the rental company’s emergency phone number saved.


FAQ


Q: What happens if I lose my only car key and I’m abroad?

A: You’ll need to contact an auto locksmith or dealer who can cut and program a new key. Have vehicle details ready. Expect cost and waiting time to increase since you have no spare.

Q: Can I just use a dealer to replace the key?

A: Yes, but often it’s slower and more expensive. UK guides claim mobile auto locksmiths are typically faster and cheaper. 

Q: How long does replacement take?

A: For many modern cars, the physical key can be cut quickly, but programming and blank arrival may take days. Dealers might take up to weeks. 

Q: Will my car insurance cover a lost key?

A: Only if you have key-cover added or your insurance includes it—not standard. Check your policy. Claiming may affect your no-claims status. 

Q: What should I do if I lose the key and my car is locked in a remote place?

A: First make sure you are safe. Then use your breakdown/roadside cover to move the vehicle to a safe area if needed. Then call an emergency auto locksmith to attend and provide a replacement.


Need a reliable solution now? Visit our shop at mr-key.com to discover how we can cut and deliver replacement car keys swiftly—even when you’re travelling.

Related Posts

How to Program a Car Key: A Step-by-Step Guide

How to Program a Car Key: A Step-by-Step Guide

Lost Your Car Key Programming? Here's What to Do Have you ever lost your car keys or found yourself with a spare key that doesn’t start your vehicle? While the process of programming a car key might seem intimidating, it’s often simpler than you’d expect. In many cases, car owners can program keys themselves without needing a visit to a dealership. This guide walks you through the essentials of car key programming, helping you save time, effort, and potentially a significant amount of money. Understanding Car Key Programming: The Basics Car key programming is the process of syncing a key with a car's internal computer so it can communicate securely. Modern vehicles use transponder keys or smart keys equipped with chips that emit a unique signal. Without proper programming, these keys won’t function, even if they fit perfectly into the ignition. While older mechanical keys didn’t require programming, today’s advanced systems add a layer of security, reducing the risk of car theft. However, this added sophistication means that replacing or reprogramming a key is no longer as simple as cutting a piece of metal. Quick Tip: Check your vehicle’s owner manual to see if programming your car key is a DIY-friendly process, as some models allow self-programming, while others require professional tools. Step-by-Step Guide to Programming a Car Key Before starting, ensure you have all necessary tools and information: The vehicle’s owner manual. All keys that need programming, including the functional ones. Step 1: Access Programming Mode Start by sitting in the driver’s seat with all the doors closed. Insert the already functional key into the ignition and turn it to the “on” position (do not start the engine). Some vehicles require you to cycle the key between “on” and “off” positions a specific number of times to enter programming mode. Step 2: Add the New Key Once in programming mode, remove the functional key and quickly insert the new key into the ignition. Turn it to the “on” position. The vehicle’s security light may flash to indicate the key has been successfully programmed. Step 3: Test the Key After programming, remove the new key and test it to ensure it can start the car and unlock the doors. Note: Each car manufacturer has unique programming steps. Be sure to consult your owner’s manual or the manufacturer’s website for specific instructions. When Professional Help Is Needed While many vehicles allow for DIY key programming, others require specialized equipment or software that only dealerships or locksmiths can access. This is particularly true for luxury or high-end cars with advanced encryption and security features. If your DIY efforts fail, it’s best to seek help from a certified professional. Visiting a dealership is a reliable, albeit more expensive, option. Alternatively, professional locksmiths often provide programming services at a lower cost, making them a practical choice for many drivers. Costs and Considerations The cost of programming a car key varies significantly based on the vehicle’s make and model. For basic models, self-programming might cost nothing if you already have a functional key. However, professional programming can range from $50 to $300 or more, especially for smart keys or proximity fobs. To minimize costs: Have a spare key : Always keep a functional spare to simplify programming if a replacement is needed. Research costs : Call local locksmiths or dealerships to compare pricing. Empower Yourself with Knowledge Programming a car key doesn’t have to be a daunting task. With the right tools and information, many car owners can handle the process themselves, saving time and money. However, it’s essential to recognize when professional assistance is necessary, particularly for complex key systems. By understanding the basics of car key programming and following a step-by-step approach, you can ensure your vehicle remains secure and functional. So, whether it’s a spare key or a replacement, you now have the confidence to tackle the task or know where to turn for help.

The Importance of Regularly Updating Your Car's Key Fob Software

The Importance of Regularly Updating Your Car's Key Fob Software

In the digital age, vehicle security has evolved beyond traditional locks and keys. Modern cars rely on sophisticated electronic systems, with key fobs playing a crucial role in convenience and safety. However, many car owners overlook the importance of regularly updating their key fob software. Like any other electronic device, key fobs require updates to function optimally and protect against emerging threats. This article explores why keeping your car's key fob software up-to-date is essential for security, functionality, and overall vehicle performance. Enhanced Security Against Keyless Theft One of the primary reasons to update your key fob software is to safeguard your vehicle against hacking and theft. Car thieves have become increasingly tech-savvy, using methods such as relay attacks and key cloning to gain unauthorized access to vehicles. Manufacturers frequently release software updates to counteract these evolving threats, strengthening encryption protocols and implementing new security measures. Regular updates ensure that your vehicle remains protected against the latest hacking techniques, reducing the risk of keyless car theft. Improved Functionality and Performance Software updates do more than just enhance security; they also improve the functionality of your key fob. Updates can optimize the communication between the key fob and the vehicle, ensuring seamless operation of features like remote start, keyless entry, and trunk access. Some updates may also introduce new capabilities, such as extended remote range or better battery efficiency. By keeping your key fob software up to date, you maximize the effectiveness of these features, enhancing your overall driving experience. Fixing Bugs and Resolving Malfunctions Like any software-based system, key fobs can experience glitches or bugs over time. You may notice issues such as delayed responses, intermittent connectivity, or complete failure to unlock or start your car. In many cases, these problems stem from outdated software. Manufacturers release updates to fix such bugs, ensuring that your key fob operates smoothly. If you’ve been experiencing issues with your key fob, checking for software updates is a simple yet effective solution. Compatibility with Newer Vehicle Features Automakers continuously upgrade their vehicle software, adding new safety and convenience features. To ensure compatibility, your key fob software must also stay updated. For example, if your car receives an over-the-air (OTA) update that enhances security protocols, an outdated key fob may no longer function correctly. Keeping both your vehicle and key fob software current ensures seamless integration, preventing functionality issues and maintaining an optimal driving experience. How to Update Your Key Fob Software Updating your key fob software may vary depending on the manufacturer and model of your vehicle. Here are a few common ways to ensure your key fob is up to date: Check the Manufacturer’s Website – Automakers often release software updates for key fobs and other electronic components on their official websites. Look for any available updates specific to your vehicle model. Visit a Dealership or Certified Service Center – Many car manufacturers require key fob updates to be installed at an authorized dealership or service center. Technicians can update your key fob and ensure it is properly synced with your vehicle. Use a Mobile App (If Available) – Some modern car brands offer mobile apps that allow users to update their key fob software remotely. Check if your vehicle’s manufacturer provides such an option. Consult Your Owner’s Manual – Your car’s manual may provide instructions on how to check for key fob software updates and whether they can be performed manually. Regularly updating your car's key fob software is a simple yet crucial step in maintaining vehicle security and functionality. Updates help protect against theft, fix software glitches, and ensure compatibility with new vehicle features. Given the increasing reliance on electronic key systems, staying proactive about updates is essential. Whether through a dealership visit or an online update, keeping your key fob’s software current will help you enjoy a safer and more convenient driving experience. Stay informed, stay updated, and keep your vehicle secure.

Condensation Inside Motorcycle TFT Displays: Causes, Warning Signs & What It Really Means

Condensation Inside Motorcycle TFT Displays: Causes, Warning Signs & What It Really Means

Every modern motorcycle rider has seen it. You park your bike after a cold morning ride, glance at the dashboard, and notice a faint haze forming behind the TFT screen. Maybe small droplets gather along the edges. Maybe the whole display looks fogged from the inside. That moisture is not cosmetic. It is water inside a sealed electronic unit — and it is the earliest visible warning of a problem that can destroy a component costing €700 to over €1,200 to replace. This guide explains exactly why condensation forms inside motorcycle TFT displays, which bikes are most affected, what it really means for your instrument cluster, and the one affordable upgrade that prevents the damage cycle before it starts. Why Motorcycle TFT Displays Get Condensation Inside A motorcycle TFT display is a sealed electronic module exposed to some of the harshest conditions any screen will ever face. Unlike your phone in a pocket, a motorcycle dashboard sits directly in the path of rain, road spray, temperature swings, UV radiation, and constant vibration. Condensation forms when warm, humid air trapped inside the display housing meets a cooler surface — the glass front panel. The moisture in that air turns to liquid droplets on the coldest point, which is almost always the inside face of the screen. Here is how moisture gets trapped in the first place. Thermal breathing. Every ride creates a heat cycle. The engine, direct sunlight, and the display's own backlight warm the air inside the housing. When the bike stops and cools, that air contracts and draws in fresh, humid outside air through micro-gaps in the seals. Over weeks and months, humidity accumulates inside the unit. Seal degradation. The rubber gaskets and adhesive bonds that seal a TFT housing are not permanent. UV exposure breaks down rubber. Vibration loosens adhesive joints. Temperature cycling causes materials to expand and contract at different rates, gradually opening pathways for water ingress. Micro-damage to the front surface. Stone chips, cleaning scratches, and pressure marks on the display face can create hairline cracks invisible to the naked eye. These become moisture entry points — especially in rain or when using a pressure washer. High-humidity environments. Riders in coastal areas, tropical climates, or northern European countries with persistent dampness face accelerated moisture ingress. A bike garaged in a humid environment without ventilation is particularly vulnerable. The result is always the same: water inside the display that the sealed housing cannot easily release. Which Motorcycles Are Most Affected Condensation inside TFT displays is not limited to one manufacturer. It has been documented across virtually every major brand using TFT instrument clusters. BMW — The R 1250 GS, R 1300 GS, S 1000 RR, F 850 GS, and F 900 R all use 6.5-inch or 10.25-inch TFT displays. These are high-quality units, but they sit in exposed positions — particularly on adventure models ridden in all weather conditions. OEM replacement for the 6.5-inch TFT runs around £1,200, and if the wiring loom is damaged during theft or failure, that figure can reach £3,000+. Yamaha — Models like the MT-09, MT-07, Tracer 9, and Ténéré 700 use TFT dashboards. Yamaha's displays are generally well-sealed, but the same thermal breathing cycle applies. Adventure and touring riders who cover high mileage in variable conditions report condensation after 2–3 seasons. Honda — The Africa Twin, CB650R, and CBR1000RR-R all run TFT clusters. The Africa Twin's display sits in a highly exposed cockpit position. Forum reports from owners confirm moisture ingress, especially after extended wet-weather riding. Triumph — The Tiger 900, Street Triple, and Speed Triple RS use TFT displays. Triumph's units are compact, but the same vulnerability to vibration-induced seal failure applies across the range. Kawasaki — The Z900, Ninja 1000SX, Versys 1000, and newer Z650 models all feature TFT dashboards. Like all manufacturers, Kawasaki's sealed units face the same environmental pressures. The pattern is clear: this is not a brand-specific defect. It is an inherent vulnerability of mounting sensitive display technology in one of the most hostile environments imaginable. The Warning Signs You Should Never Ignore Condensation inside a motorcycle TFT display is progressive. It starts small and escalates. Here is what each stage looks like — and what it means. Light fogging after a cold start. A thin mist on the inside of the screen that clears within 10–15 minutes of riding. This is the earliest sign. Moisture is present inside the housing but has not yet caused damage. At this stage, the problem is still manageable. Persistent edge condensation. Droplets that form along the bottom or side edges of the display and do not fully evaporate during a ride. This means moisture is accumulating faster than it can escape. The seals are compromised. Internal staining or water marks. Visible trails, spots, or discolouration behind the glass that remain even when the display is dry. This is mineral residue from evaporated water. It means moisture has been cycling inside the display repeatedly. The internal coatings and bonding layers are being attacked. Intermittent display issues. Flickering backlight, sections of the screen dimming unevenly, or the display briefly shutting off during a ride. These are early signs of electrical damage from moisture reaching the circuit board or flex connectors behind the panel. Dead pixels appearing alongside condensation. If you see pixel failure combined with any visible moisture, the display is in active degradation. The liquid crystal layer or its driver circuits are being damaged. This combination almost always leads to full failure. Complete display blackout. The screen powers on but shows nothing, or fails to power on at all. At this point, the TFT module is usually beyond repair and must be replaced entirely. The critical takeaway: condensation that clears quickly is a warning. Condensation that stays, stains, or coincides with display glitches means damage is already underway. What Condensation Actually Does to a TFT Display The fog itself is not the problem. The damage happens behind it. A motorcycle TFT display is a laminated stack of layers: a front glass or polycarbonate cover, a polarising film, the liquid crystal panel itself, LED backlighting, and a circuit board with drivers and connectors. All bonded together with adhesive and housed in a sealed plastic or metal frame. When moisture sits inside this assembly, several destructive processes begin simultaneously. Corrosion of electrical contacts. The flex cables and solder joints connecting the LCD panel to the main circuit board are extremely sensitive to moisture. Even trace amounts of water can cause oxidation, increasing resistance and eventually breaking the connection. This is how entire rows or columns of pixels fail at once. Delamination of optical layers. The adhesive bonds between the polariser, LCD panel, and backlight diffuser swell and weaken when exposed to moisture. This causes visible clouding, uneven brightness, and eventually permanent optical distortion. Mineral deposits on internal surfaces. Water that evaporates inside the display leaves behind dissolved minerals and contaminants. These deposits scatter light, reduce contrast, and cannot be cleaned without disassembling the unit — which is rarely possible without destroying it. Short circuits on the PCB. If enough moisture reaches the main circuit board, it can bridge traces and create short circuits. This can cause complete display failure, error codes, or even damage to the motorcycle's CAN bus communication system. A motorcycle TFT display is not designed to be serviced. It is a sealed, disposable module. Once moisture damage reaches the internal electronics, the only option is full replacement. How to Prevent Water Ingress in Motorcycle TFT Displays Before Damage Starts Prevention is not complicated. But it requires acting before symptoms appear — not after. Never use a pressure washer on the dashboard. High-pressure water jets force moisture past seals that can handle rain but not direct, concentrated spray. Wash the display area gently with a damp microfibre cloth and motorcycle-safe LCD cleaner. Avoid parking in direct sunlight for extended periods. Prolonged heat accelerates UV degradation of seals and adhesives. It also increases the temperature differential that drives the thermal breathing cycle. Use a cover or park in shade when possible. Store the bike in a ventilated, dry environment. A damp, unventilated garage is one of the worst places for a motorcycle with a TFT display. If humidity control is not possible, a small dehumidifier or silica gel packs placed near the bike can help. Inspect the display edges regularly. Look for any visible gap between the display housing and its frame, or any separation of the front glass from the body. Catching a seal failure early — before moisture accumulates — gives you the chance to act. Protect the display surface from physical damage. The front face of the TFT is the largest and most vulnerable entry point for moisture. A single stone chip or a scratch from an abrasive cloth can breach the surface coating and create a pathway for water. Preventing that surface damage is the single most effective thing you can do. The One Upgrade That Prevents Condensation Damage in Motorcycle TFT Displays A quality screen protector designed specifically for your motorcycle's TFT display is the most cost-effective protection available — by a wide margin. Here is what a properly fitted screen protector actually does. It creates a physical barrier against impact. Stone chips, gravel flicks, and minor impacts hit the protector instead of the display surface. This eliminates the micro-cracks that become moisture entry points. It shields the surface from UV radiation. UV is the primary cause of seal and adhesive degradation. A screen protector absorbs UV energy before it reaches the display housing, slowing the ageing process of the seals beneath. It prevents cleaning damage. Without a protector, wiping the TFT with a dirty cloth, gloves, or the wrong cleaning product can create fine scratches that compromise the surface. With a protector fitted, you can clean aggressively without risking the display itself. After a few years, replace the protector — the screen underneath stays pristine. It reduces direct water contact with the display edges. A well-fitted protector overlaps the display bezels slightly, redirecting water away from the most vulnerable seal points around the screen perimeter. The cost comparison makes the decision obvious. A screen protector costs between €10 and €25. A TFT display replacement costs €700 to €1,500 or more, depending on the motorcycle. That is a return on investment measured in thousands of percent. Riders who fit a screen protector on day one of ownership — before the first ride, before the first stone chip, before the first rain — give their TFT display the best possible chance of lasting the life of the motorcycle. What to Do If You Already Have Condensation If moisture is already visible inside your display, the situation is not necessarily hopeless — but your options depend on how far it has progressed. If you see light fogging only. Park the bike in a warm, dry, ventilated space. Run the engine and let the display heat up for 20–30 minutes to encourage evaporation. Some riders have had success placing a small silica gel packet near the display housing to draw out residual moisture. Fit a screen protector immediately to prevent further surface-level water entry. If the bike is under warranty. Contact your dealer. Condensation inside a sealed TFT display is a manufacturing defect in the seal or housing. Many manufacturers — including BMW and KTM — have replaced displays under warranty for this exact issue. Document the condensation with clear photographs before your appointment. If condensation has caused staining or pixel issues. At this stage, the damage is internal and typically irreversible without replacing the display module. Get a quote from your dealer, check whether aftermarket options exist for your model, and fit a screen protector to the new unit immediately to prevent the cycle repeating. FAQ Is condensation inside my motorcycle TFT display normal? A very light, temporary fog on a cold morning that clears within minutes can occur even in a properly sealed unit. However, persistent condensation, visible droplets, or any staining is not normal — it indicates a compromised seal and active moisture ingress. Can I fix condensation inside a motorcycle display myself? If it is only light fogging, gentle heat and dry storage may resolve it temporarily. However, the seals are already compromised, so it will likely return. Full repair requires resealing or replacing the display unit, which is not a realistic DIY job for most riders. Will condensation void my warranty? No. Condensation inside a sealed factory unit is a seal failure, not user damage. Most manufacturers honour warranty claims for moisture ingress, provided there is no evidence of physical impact or tampering. Always document the issue with photos. How much does it cost to replace a motorcycle TFT display? OEM replacement costs vary significantly. BMW TFT units typically cost £700–£1,200 for the part alone, plus fitting. Honda, Yamaha, Triumph, and Kawasaki displays range from €400–€900 depending on the model. Labour adds €100–€300. Does a screen protector actually prevent condensation? A screen protector does not fix existing condensation. What it does is prevent the surface damage — stone chips, scratches, UV degradation — that causes seals to fail and moisture to enter in the first place. It is the most effective preventive measure available. Should I fit a screen protector to a brand-new bike? Yes. Day one. Before the first ride. The TFT display is at its most vulnerable when new because the seals have not yet been tested, and any early surface damage will accelerate their failure. Protecting the screen from the start is the best insurance against a four-figure repair bill down the line. Does riding in rain damage a motorcycle TFT display? Rain alone should not damage a properly sealed TFT display. The issue is cumulative: repeated exposure to rain, spray, temperature cycling, and UV gradually degrades seals over time. A screen protector significantly slows this process by shielding the most exposed surface. Protect Your Display Before It Costs You Hundreds A motorcycle TFT display is one of the most expensive single components on a modern bike — and one of the most exposed. The damage from water ingress is progressive, often invisible until it is too late, and almost always irreversible. A screen protector fitted from day one is the simplest, cheapest, and most effective way to protect that investment. Browse precision-fit motorcycle TFT screen protectors for BMW, Yamaha, Honda, Triumph, Kawasaki, and more at mr-key.com.

The Essential Car Parts Guide: Understanding Your Vehicle's Core Components

The Essential Car Parts Guide: Understanding Your Vehicle's Core Components

Unveiling the Anatomy of Your Car Your car is more than just a mode of transportation—it's a complex machine composed of various parts working in harmony to ensure smooth and safe driving. Understanding these essential car parts not only helps you appreciate your vehicle better but also empowers you to identify issues, perform basic maintenance, and communicate effectively with mechanics. In this guide, we’ll explore the key components that keep your car running and why they’re vital for optimal performance. 1. Engine: The Heart of Your Vehicle The engine is the powerhouse of your car, converting fuel into energy to propel the vehicle forward. There are various types of engines, including: Internal Combustion Engines (ICE): Common in most vehicles, using gasoline or diesel. Hybrid Engines: Combining a traditional engine with an electric motor for better efficiency. Electric Motors: Found in EVs, powered by rechargeable batteries. Key components within the engine include pistons, the crankshaft, and the timing belt. Regular maintenance like oil changes and timely inspections are crucial for keeping the engine in good condition. 2. Transmission: Changing Gears Made Easy The transmission system ensures that power from the engine is transferred to the wheels at the correct speed and torque. There are two main types of transmissions: Manual Transmission: Requires the driver to shift gears manually. Automatic Transmission: Shifts gears automatically, providing greater convenience. Proper transmission fluid levels are essential for smooth gear transitions and the longevity of the system. 3. Battery: Your Vehicle's Power Source The car battery supplies the electrical power needed to start the engine and operate various electrical systems, such as lights, wipers, and infotainment. Modern vehicles may also include auxiliary batteries for additional power needs. Maintenance Tip: Regularly check battery terminals for corrosion and ensure proper voltage levels, especially in extreme weather conditions. 4. Braking System: Your Lifeline on the Road The braking system ensures the vehicle slows down or stops when needed, making it a critical safety component. Key parts include: Brake Pads and Rotors: Convert kinetic energy into heat, slowing the car down. Brake Fluid: Transfers force from the brake pedal to the braking mechanism. Regular inspection of the braking system can prevent wear and ensure reliability. 5. Tires and Wheels: Where the Rubber Meets the Road Tires and wheels are vital for traction, handling, and overall vehicle stability. There are various types of tires designed for specific conditions, such as all-season, winter, and performance tires. Maintenance Tip: Regularly check tire pressure, alignment, and tread depth to ensure safe driving and optimal fuel efficiency. 6. Suspension System: Smoothing Out the Ride The suspension system absorbs shocks from uneven road surfaces, ensuring a smooth and stable ride. Key components include: Shock Absorbers: Reduce impact from road irregularities. Struts and Springs: Provide structural support and maintain balance. A well-maintained suspension system enhances comfort and handling. 7. Exhaust System: Keeping Emissions in Check The exhaust system directs harmful gases away from the engine and reduces emissions. Key components include the muffler, catalytic converter, and exhaust pipes. Environmental Note: A faulty exhaust system can increase emissions and negatively impact air quality. Regular checks are essential for compliance with emission standards. 8. Cooling System: Preventing Overheating The cooling system regulates the engine's temperature to prevent overheating. It includes components like the radiator, coolant, and thermostat. Maintenance Tip: Regularly check coolant levels and inspect hoses for leaks to ensure efficient cooling. 9. Fuel System: Delivering Energy to the Engine The fuel system stores and supplies fuel to the engine for combustion. Key parts include the fuel pump, injectors, and fuel tank. Efficiency Tip: Clean fuel injectors and replace the fuel filter as needed to maintain optimal fuel efficiency. 10. Electrical System: Powering Your Vehicle's Features From the headlights to the infotainment system, the electrical system powers numerous features in your car. It includes wiring, alternators, and fuses. Maintenance Tip: Inspect fuses and ensure the alternator is functioning properly to avoid electrical issues. Empowering Yourself Through Knowledge Understanding the essential parts of your car equips you with the knowledge to maintain your vehicle effectively and address issues proactively. By staying informed, you can extend the life of your car, save on repair costs, and ensure a safer driving experience. Whether you’re a car enthusiast or a regular driver, knowing your vehicle’s anatomy is the first step toward smarter car ownership.

Chat with us